VB2010 Lesson 21- Managing Graphics 1-Basic Concepts
|
21.1 Introduction Managing graphics is easy in earlier versions of Visual Basic as they have built-in drawing tools. For example, In Visual Basic 6, the drawing tools are included in the toolbox where the programmer just need to drag the shape controls into the form to create rectangle, square, ellipse,circle and more. However, its simplicity has the shortcomings, you don't have much choices in creating customized drawings.
21.1 Creating the Graphics Object Before you can draw anything on a form, you need to create the Graphics object in vb2010. A graphics object is created using a CreateGraphics() method. You can create a graphics object that draw to the form itself or a control. For example, if you wish to draw to the form, you can use the following statement:
*Always use Dim to define the object. Using me instead of Form1 because it is not allow in VB2010. Or if you want the graphics object to draw to a picturebox, you can write the following statement:
You can also use the textbox as a drawing surface, the statement is:
The Graphics object that is created does not draw anything on the screen until you call the methods of the Graphics object. In addition,you need to create the Pen object as the drawing tool. We will examine the code that can create a pen in the following section.
21.2 Creating a Pen A Pen can be created using the following code:
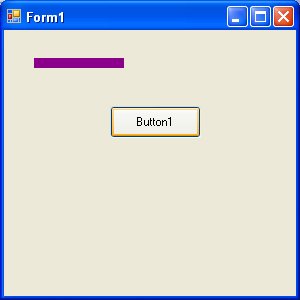
where myPen is a Pen variable. You can use any variable name instead of myPen. The first argument of the pen object define the color of the drawing line and the second argument define the width of the drawing line. You can also create a Pen using the following statement: myPen As Pen myPen = New Pen(Drawing.Color.Blue, 5)Where the first argument define the color(here is blue, you can change that to red or whatever color you want) and the second argument is the width of the drawing line. Having created the Graphics and the Pen objects, you are now ready to draw graphics on the screen which we will show you in the following section.s 21.3 Drawing a Line In this section, we will show you how to draw a straight line on the Form. First of all, launch Visual basic 2010 Express. In the startup page, drag a button into the form. Double click on the button and key in the following code. Dim myGraphics As Graphics = me.CreateGraphics Dim myPen As Pen myPen = New Pen(Brushes.DarkMagenta, 10)myGraphics.DrawLine(myPen, 10, 10, 100, 10) End SubThe second created the Graphics object and the third and fourth line create the Pen object. The fifth draw a line on the Form using the DrawLine method. The first argument use the Pen object created by you, the second argument and the third arguments define the coordinate the starting point of the line, the fourth and the last arguments define the ending coordinate of the line. The general syntax of the Drawline argument is object.DrawLine(Pen, x1, y1, x2, y2) The output of the program is shown below:
That's all for the lesson at the moment, you can modify the above the code by changing the color and the width of the line as well as the coordinates of the starting and the ending points. We will show you how to draw shapes and more drawing options in the coming lesson.
Copyright 2010 Dr.Liew Voon Kiong . All rights reserved |Contact: vbtutor facebook page [Privacy Policy] |