[Lesson 20] << [CONTENTS] >> [Lesson 22]
21.1 Introduction to Graphics
Though Managing graphics in earlier versions of Visual Basic seem easier as they have built-in drawing tools, Visual Basic 2010 is much more versatile in handling graphics. For example, In Visual Basic 6, the drawing tools are included in the toolbox where the programmer just need to drag the shape controls into the form to create rectangle, square, ellipse, circle and more. However, its simplicity has the shortcomings, you don’t have many choices in creating customized drawings.
Since Visual Basic evolved into a fully OOP language under the VB.net framework, shape controls are no longer available. Now the programmer needs to write code to create various shapes and drawings. Even though the learning curve is steeper, the programmer can write powerful code to create all kinds of graphics. You can even design your own controlsVisual Basic 2010 offers various graphics capabilities that enable programmers to write code that can draw all kinds of shapes and even fonts. In this lesson, you will learn how to write code to draw lines and shapes on the VB interface.
21.1 Creating the Graphics Object
Before you can draw any graphic on a form, you need to create the Graphics object in vb2010. A graphics object is created using a CreateGraphics() method. You can create a graphics object that draws to the form itself or a control. For example, if you wish to draw to the form, you can use the following statement:
Dim myGraphics As Graphics =me.CreateGraphics
*Always use Dim to define the object. Using me instead of Form1 because it is not allowed in Visual Basic 2010.
Or if you want the graphics object to draw to a picturebox, you can write the following statement:
Dim myGraphics As Graphics = PictureBox1.CreateGraphics
You can also use the text box as a drawing surface, the statement is:
Dim myGraphics As Graphics = TextBox1.CreateGraphics
The Graphics object that is created does not draw anything on the screen until you call the methods of the Graphics object. In addition, you need to create the Pen object as the drawing tool. We will examine the code that can create a pen in the following section.
21.2 Creating a Pen
A Pen can be created using the following code:
myPen = New Pen(Brushes.DarkMagenta, 10)
where myPen is a Pen variable. You can use any variable name instead of myPen. The first argument of the pen object define the color of the drawing line and the second argument defines the width of the drawing line.
You can also create a Pen using the following statement:
Dim myPen As Pen
myPen = New Pen(Drawing.Color.Blue, 5)
Where the first argument define the color(here is blue, you can change that to red or whatever color you want) and the second argument is the width of the drawing line.
Having created the Graphics and the Pen objects, you are now ready to draw graphics on the screen which we will show you in the following section.s
In this section, we will show you how to draw a straight line on the Form.
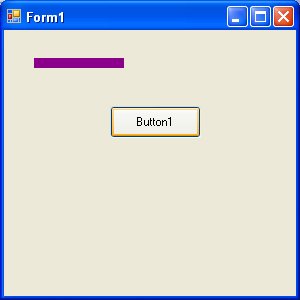
First of all, launch Visual basic 2010 Express. In the startup page, drag a button into the form. Double click on the button and key in the following code.
Private Sub Button1_Click(ByVal sender As System.Object, ByVal e As System.EventArgs) Handles Button1.Click
Dim myGraphics As Graphics = me.CreateGraphics
Dim myPen As Pen
 myPen = New Pen(Brushes.DarkMagenta, 10)
 myGraphics.DrawLine(myPen, 10, 10, 100, 10)
End Sub
The second created the Graphics object and the third and fourth line create the Pen object. The fifth draw a line on the Form using the DrawLine method. The first argument use the Pen object created by you, the second argument and the third arguments define the coordinate the starting point of the line, the fourth and the last arguments define the ending coordinate of the line. The general syntax of the Drawline argument is
object.DrawLine(Pen, x1, y1, x2, y2)
The output of the program is shown below: