
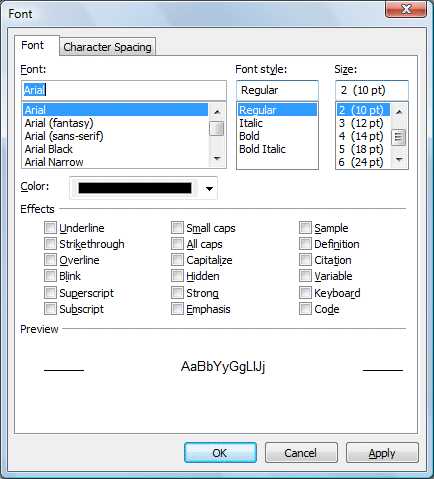
The Checkbox is a very useful control in Visual Basic 2012. It allows the user to select one or more items by checking the check box or check boxes concerned. For example, in the Font dialog box of any Microsoft Text editor like Microsoft Words, there are many check boxes under the Effects section such as that shown in Figure 17.1. The user can choose underline, subscript, small caps, superscript, blink and etc.
In Visual Basic 2012, you can create a shopping cart where the user can click on check boxes that correspond to the items they intend to buy. Besides that, the total payment can be computed at the same time, as shown in Figure 17.2.
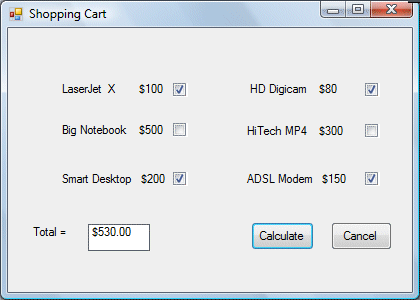
The program code for shopping cart is as follows:
Private Sub BtnCalculate_Click(ByVal sender As System.Object, ByVal e As System.EventArgs) Handles BtnCalculate.Click
 Const LX As Integer = 100
 Const BN As Integer = 500
 Const SD As Integer = 200
 Const HD As Integer = 80
 Const HM As Integer = 300
 Const AM As Integer = 150
 Dim sum As Integer

If CheckBox1.Checked = True Then
 sum += LX
End If

If CheckBox2.Checked = True Then
 sum += BN
End If

If CheckBox3.Checked = True Then
 sum += SD
End If
If CheckBox4.Checked = True Then
 sum += HD
End If

If CheckBox5.Checked = True Then
 sum += HM
End If

If CheckBox6.Checked = True Then
 sum += AM
End If
Label5.Text = sum.ToString("c")

End Sub
Here is another example
Private Sub Button1_Click(ByVal sender As System.Object, ByVal e As System.EventArgs) Handles Button1.Click
 Const large As Integer = 10.0
 Const medium As Integer = 8
 Const small As Integer = 5
 Dim sum As Integer

If CheckBox1.Checked = True Then
 sum += large
End If

If CheckBox2.Checked = True Then
 sum += medium
End If

If CheckBox3.Checked = True Then
 sum += small
End If
Label5.Text = sum.ToString("c")
End Sub
In this example, the user can enter text into a text box and format the font using the three check boxes that represent bold, italic and underline.
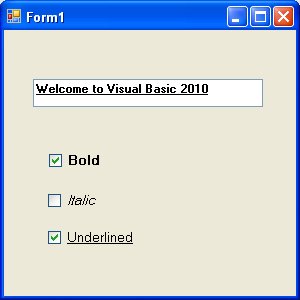
Private Sub CheckBox1_CheckedChanged(ByVal sender As System.Object, ByVal e As System.EventArgs) Handles CheckBox1.CheckedChanged
If CheckBox1.Checked Then
 TextBox1.Font = New Font(TextBox1.Font, TextBox1.Font.Style Or FontStyle.Bold)
Else
 TextBox1.Font = New Font(TextBox1.Font, TextBox1.Font.Style And Not FontStyle.Bold)
End If
End Sub

Private Sub CheckBox2_CheckedChanged(ByVal sender As System.Object, ByVal e As System.EventArgs) Handles CheckBox2.CheckedChanged
If CheckBox2.Checked Then
 TextBox1.Font = New Font(TextBox1.Font, TextBox1.Font.Style Or FontStyle.Italic)
Else
TextBox1.Font = New Font(TextBox1.Font, TextBox1.Font.Style And Not FontStyle.Italic)

End If
End Sub

Private Sub CheckBox3_CheckedChanged(ByVal sender As System.Object, ByVal e As System.EventArgs) Handles CheckBox3.CheckedChanged
If CheckBox2.Checked Then
 TextBox1.Font = New Font(TextBox1.Font, TextBox1.Font.Style Or FontStyle.Underline)
Else
TextBox1.Font = New Font(TextBox1.Font, TextBox1.Font.Style And Not FontStyle.Underline)
End If
End Sub
* The above program uses the CheckedChanged event to respond to the user selection by checking a particular check box, it is similar to the click event. The statement
TextBox1.Font = New Font(TextBox1.Font, TextBox1.Font.Style Or FontStyle.Italic)
will retain the original font type but change it to italic font style. The statement
TextBox1.Font = New Font(TextBox1.Font, TextBox1.Font.Style And Not FontStyle.Italic)
will also retain the original font type but change it to regular font style. (The other statements employ the same logic)
Copyright©2008 Dr.Liew Voon Kiong. All rights reserved |Contact|Privacy Policy