
To effectively write an event procedure for a control to respond to an event, it is necessary to configure specific properties that dictate its appearance and functionality. These properties can be set either through the properties window or dynamically during runtime.
Figure 3.1 is a typical properties window for a form. In the properties window, the item appears at the top part is the object currently selected. At the bottom part, the items listed in the left column represent the names of various properties associated with the selected object while the items listed in the right column represent the states of the properties. Properties can be set by highlighting the items in the right column then change them by typing or selecting the options available.

For example, in order to change the caption, just highlight Form1 under the name Caption and change it to other names. You may also alter the appearance of the form by setting it to 3D or flat, change its foreground and background color, change the font type and font size, enable or disable, minimize and maximize buttons and more.
You can also change the properties at runtime to give special effects such as change of color, shape, animation effect and so on. Example 3.1 show the code that will change the form color to red every time the form is loaded. VB uses the hexadecimal system to represent the color. You can check the color codes in the properties windows which are showing up under ForeColor and BackColor .
This example changes the background colour of the form using the BackColor property.
Private Sub Form_Load()
Form1.Show
Form1.BackColor = &H000000FF&
End Sub
This example is to change the control's Shape using the Shape property. This code will change the shape to a circle at runtime.
Private Sub  Form_Load()
Shape1.Shape = 3
End Sub
We are not going into the details on how to set the properties yet. However, we would like to stress a few important points about setting up the properties.
Figure 3.2 below is the VB6 toolbox that shows the basic controls.

The text box is the standard control for accepting input from the user as well as to display the output. It can handle string (text) and numeric data but not images or pictures. A string entered into a text box can be converted to a numeric data by using the function Val(text). The following example illustrates a simple program that processes the input from the user.
In this program, two text boxes are inserted into the form together with a few labels. The two text boxes are used to accept inputs from the user and one of the labels will be used to display the sum of two numbers that are entered into the two text boxes. Besides, a command button is also programmed to calculate the sum of the two numbers using the plus operator. The program use creates a variable sum to accept the summation of values from text box 1 and text box 2.The procedure to calculate and to display the output on the label is shown below.
Private Sub Command1_Click()
'To add the values in TextBox1 and TextBox2
  Sum = Val(Text1.Text) +Val(Text2.Text)
'To display the answer on label 1
  Label1.Caption = Sum
End Sub
The output is shown in Figure 3.3

The label is a very useful control for Visual Basic, as it is not only used to provide instructions and guides to the users, it can also be used to display outputs. One of its most important properties is Caption. Using the syntax Label.Caption, it can display text and numeric data . You can change its caption in the properties window and also at runtime. Please refer to Example 3.1 and Figure 3.1 for the usage of the label.
The command button is one of the most important controls as it is used to execute commands. It displays an illusion that the button is pressed when the user click on it. The most common event associated with the command button is the Click event, and the syntax for the procedure is
Private Sub Command1_Click ()
 Statements
End Sub
In this program, we want to crack a secret passoword entered by the user. In the design phase, insert a command button and change its name to cmd_ShowPass. Next, insert a TextBox and rename it as TxtPassword and delete Text1 from the Text property. Besides that, set its PasswordChr to *. Now, enter the following code in the code window.
Private Sub cmd_ShowPass_Click()
 Dim yourpassword As String
 yourpassword = Txt_Password.Text
 MsgBox ("Your password is: " & yourpassword)
End Sub
Run the program and enter a password, then click on the Show Password button to reveal the password, as shown in Figure 3.4.

You can also reveal the password by setting the PasswordChr property back to normal mode, as follows:
Private Sub cmd_ShowPass_Click()
Dim yourpassword As String
Txt_Password.PasswordChar = ""
End Sub
*Check out our more advanced password cracker program
The Picture Box is one of the controls that is used to handle graphics. You can load a picture at design phase by clicking on the picture item in the properties window and select the picture from the selected folder. You can also load the picture at runtime using the LoadPicture method. For example, the statement will load the picture grape.gif into the picture box.
Picture1.Picture=LoadPicture ("C:\VBprogram\Images\grape.gif")
In this program, insert a command button and a picture box. Enter the following code:
Private Sub cmd_LoadPic_Click()
MyPicture.Picture = LoadPicture("C:\Users\admin.DESKTOP-G1G4HEK\Documents\My Websites\vbtutor\vb6\images\uranus.jpg")
End Sub
* You must ensure the path to access the picture is correct. Besides that, the image in the picture box is not resizable. The output is shown in Figure 3.5
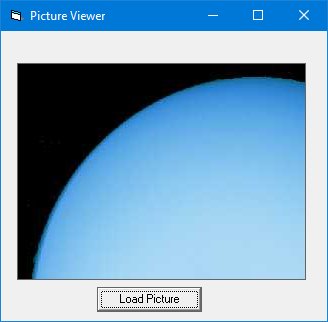
View our more advanced picture viewer here.
The Image Control is another control that handles images and pictures. It functions almost identically to the pictureBox. However, there is one major difference, the image in an Image Box is stretchable, which means it can be resized. This feature is not available in the PictureBox. Similar to the Picture Box, it can also use the LoadPicture method to load the picture. For example, the statement loads the picture grape.gif into the image box.
Image1.Picture=LoadPicture ("C:\VBprogram\Images\grape.gif")
In this program, we insert a command button and an image control into the form. Besides that, we set the image Strech property to true. Next, enter te following code:
Private Sub cmd_LoadImg_Click()
 MyImage.Picture = LoadPicture("C:\Users\admin.DESKTOP-G1G4HEK\Documents\My Websites\vbtutor\vb6\images\uranus.jpg")
End Sub
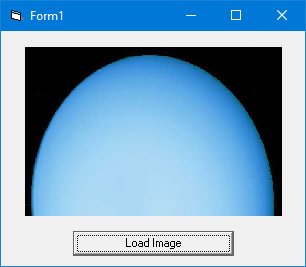
* Note the the difference between the image in Figure 3.5 and Figure 3.6.
The function of the ListBox is to present a list of items where the user can click and select the items from the list. In order to add items to the list, we can use the AddItem method. For example, if you wish to add a number of items to list box 1, you can key in the following statements
Private Sub Form_Load ( )
 List1.AddItem “Lesson1”
 List1.AddItem “Lesson2”
 List1.AddItem “Lesson3”
 List1.AddItem “Lesson4”
End Sub
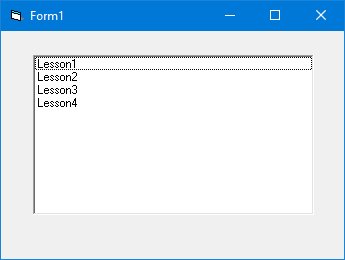
The items in the list box can be identified by the ListIndex property, the value of the ListIndex for the first item is 0, the second item has a ListIndex 1, and the third item has a ListIndex 2 and so on
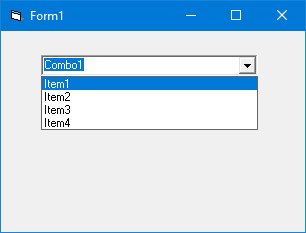
The function of the Combo Box is also to present a list of items where the user can click and select the items from the list. However, the user needs to click on the small arrowhead on the right of the combo box to see the items which are presented in a drop-down list. In order to add items to the list, you can also use the AddItem method. For example, if you wish to add a number of items to Combo box 1, you can key in the following statements
Private Sub Form_Load ( )
 Combo1.AddItem "Item1"
 Combo1.AddItem "Item2"
 Combo1.AddItem "Item3"
 Combo1.AddItem "Item4"
End Sub
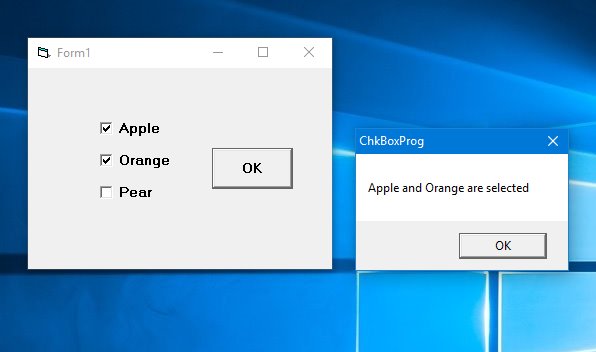
The Check Box control lets the user selects or unselects an option. When the Check Box is checked, its value is set to 1 and when it is unchecked, the value is set to 0. You can include the statements Check1.Value=1 to mark the Check Box and Check1.Value=0 to unmark the Check Box, as well as use them to initiate certain actions. For example, the program in Example 3.4 will show which items are selected in a message box.
Private Sub Cmd_OK_Click()
 If Check1.Value = 1 And Check2.Value = 0 And Check3.Value = 0 Then
  MsgBox "Apple is selected"
 ElseIf Check2.Value = 1 And Check1.Value = 0 And Check3.Value = 0 Then
  MsgBox "Orange is selected"
  ElseIf Check3.Value = 1 And Check1.Value = 0 And Check2.Value = 0 Then
  MsgBox "Orange is selected"
 ElseIf Check2.Value = 1 And Check1.Value = 1 And Check3.Value = 0 Then
  MsgBox "Apple and Orange are selected"
 ElseIf Check3.Value = 1 And Check1.Value = 1 And Check2.Value = 0 Then
  MsgBox "Apple and Pear are selected"
 ElseIf Check2.Value = 1 And Check3.Value = 1 And Check1.Value = 0 Then
  MsgBox "Orange and Pear are selected"
 Else
  MsgBox "All are selected"
 End If
End Sub
The OptionButton control also lets the user selects one of the choices. However, two or more Option buttons must work together because as one of the option buttons is selected, the other Option button will be unselected. In fact, only one Option Box can be selected at one time. When an option box is selected, its value is set to “True” and when it is unselected; its value is set to “False”.
In this example, we want to change the background color of the form according to the selected option. We insert three option buttons and change their captions to "Red Background","Blue Background" and "Green Background" respectively. Next, insert a command button and change its name to cmd_SetColor and its caption to "Set Background Color". Now, click on the command button and enter the following code in the code window:
Private Sub cmd_SetColor_Click()
 If Option1.Value = True Then
 Form1.BackColor = vbRed
 ElseIf Option2.Value = True Then
 Form1.BackColor = vbBlue
 Else
 Form1.BackColor = vbGreen
 End If
End Sub
Run the program, select an option and click the "Set Background Color" produces the output, as shown in Figure 3.10.

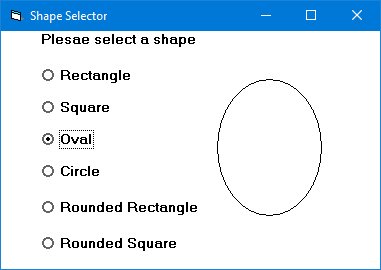
In this example, we insert six option buttons. It is better to make the option buttons into a control array as they perform similar action, i.e to change shape. In order to create a control array, click on the first option button, rename it as MyOption. Next, click on the option button and select copy then paste. After clicking the paste button, a popup dialog (Figure 3.11)will ask you whether you wish to create a control array, select yes. The control array can be accessed via its index value, MyOtion(Index. In addition, we also insert a shape control.

Now, enter the code in the code window. We use the If..Then..Else program structure to determine which option button is selected by the user. You can learn about If..Then..Else in Lesson 7.
Private Sub MyOption_Click(Index As Integer)
If Index = 0 Then
MyShape.Shape = 0
ElseIf Index = 1 Then
MyShape.Shape = 1
ElseIf Index = 2 Then
MyShape.Shape = 2
ElseIf Index = 3 Then
MyShape.Shape = 3
ElseIf Index = 4 Then
MyShape.Shape = 4
ElseIf Index = 5 Then
MyShape.Shape = 5

End If

End Sub
Run the program and you can change the shape of the shape control by clicking one of the option buttons. The output is shown in Figure 3.12.
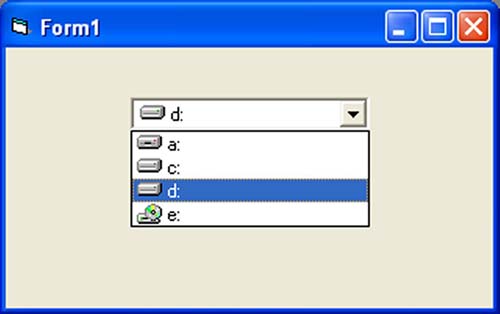
The DriveListBox is for displaying a list of drives available in your computer. When you place this control into the form and run the program, you will be able to select different drives from your computer as shown in Figure 3.13
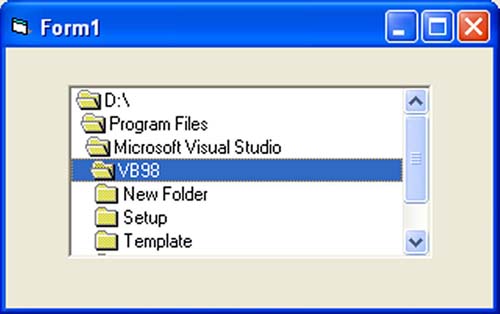
The DirListBox means the Directory List Box. It is for
displaying a list of directories or folders in a selected drive. When you place
this control into the form and run the program, you will be able to select
different directories from a selected drive in your computer as shown in Figure
3.14

You can coordinate the Drive List Box, the Directory List Box and the File List Box to search for the files you want. The procedure will be discussed in later lessons.
Copyright©2008 Dr.Liew Voon Kiong. All rights reserved |Contact|Privacy Policy