
In Visual Basic 2013, the radio buttons operate differently from the checkboxes. While the checkboxes work independently and allow the user to select one or more items, the radio buttons are mutually exclusive. It means that the user can only choose one item only out of a number of choices from the radio buttons.
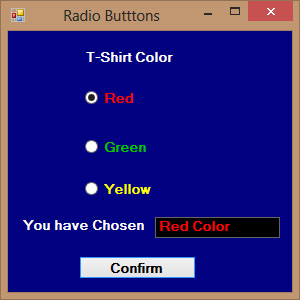
In this example, the user can only choose one T-shirt color. To design the interface, add three radio buttons and name them as RadioRed, RadioGreen, and RadioYellow respectively. Besides that, add a button to confirm the chosen color and a label control to display the chosen color. Now, name the button as BtnConfirm and the label as LblDisplay. Furthermore, we use the If...Then...Else decision-making structure to construct the program. In addition, the state of the radio button is indicated by its checked property.
Private Sub BtnConfirm_Click(sender As Object, e As EventArgs) Handles BtnConfirm.Click
Dim Tcolor As String
 If RadioRed.Checked  Then
  Tcolor = "Red Color"
  LblDisplay.ForeColor = Color.Red
 ElseIf RadioGreen.Checked  Then
  Tcolor = "Green Color"
  LblDisplay.ForeColor = Color.Green
 Else
  Tcolor = "Yellow Color"
  LblDisplay.ForeColor = Color.Yellow
 End If
 LblDisplay.Text = Tcolor
End Sub
Although the user may only select one item at a time, he might want to make more than one selection from different categories. For example, the user wishes to choose the T-shirt size and color, he might want to choose one color and one size, which means one selection in each category. In this case, we need to group the radio buttons together according to the categories. This is easily achieved in Visual Basic 2013 using the Groupbox control under the containers categories.In the Visual Basic 2013 IDE, after inserting the Groupbox from the toolbox into the form, you can proceed to insert the radio buttons into the Groupbox. Only the radio buttons inside the Groupbox are mutually exclusive, they are not mutually exclusive with the radio buttons outside the Groupbox.
To design the interface, you need to insert two group boxes. In the first group box, add four radio buttons and name them as RadioXL, RadioL, RadioM and RadioS respectively. In the second group box, add three radio buttons and name them RadioRed, RadioBlue and RadioBeige respectively. Besides that, insert two label control to display the chosen size and color, name them LblSize and LblColor respectively. Finally, add a button and name it as BtnConfirm. In the code, we shall declare two variables, TSize to indicate the T-shirt size and TColor to indicate the T-shirt color.
Private Sub BtnConfirm_Click(sender As Object, e As EventArgs) Handles BtnConfirm.Click
Dim TSize, TColor As String
 If RadioXL.Checked Then
  TSize = "XL"
 ElseIf RadioL.Checked Then
  TSize = "L"
 ElseIf RadioM.Checked Then
  TSize = "M"
 Else : TSize = "S"
 End If
 If RadioRed.Checked Then
  TColor = "Red"
 ElseIf RadioBlue.Checked Then
  TColor = "Blue"
 Else : TColor = "Beige"
 End If
  LblSize.Text = TSize
  Lblcolor.Text = TColor
End Sub

Copyright©2008 Dr.Liew Voon Kiong. All rights reserved |Contact|Privacy Policy