
In our visual basic 6 tutorial Lesson 19 and Lesson 20, we have learned how to build VB database applications using data control. However, data control is not a very flexible tool as it could work only with limited kinds of data and must work strictly in the Visual Basic environment. To overcome these limitations, we can use a much more powerful data control in VB known as ADO control. ADO stands for ActiveX data objects. As ADO is ActiveX-based, it could work in different platforms (different computer systems) and different programming languages. Besides, it could access many different kinds of data such as data displayed in the Internet browsers, email text and even graphics other than the usual relational and non relational database information.
To be able to use ADO data control, you need to insert it into the toolbox. To do this, simply press Ctrl+T to open the components dialog box and select Microsoft ActiveX Data Control 6. After this, you can proceed to build your ADO-based VB database applications.
The following example will illustrate how to build a relatively powerful database application using ADO data control. First of all, name the new form as frmBookTitle and change its caption to Book Tiles- ADO Application. Secondly, insert the ADO data control and name it as adoBooks and change its caption to book. Next, insert the necessary labels, text boxes and command buttons. The runtime interface of this program is shown in the diagram below, it allows adding and deletion as well as updating and browsing of data.

The properties of all the controls are listed as follow:
Control Name |
Property |
Form Name | frmBookTitle |
|---|---|
| Form Caption | Book Titles -ADOApplication |
| ADO Name | adoBooks |
| Label1 Name | lblApp |
| Label1 Caption | Book Titles |
| Label 2 Name | lblTitle |
| Label2 Caption | Title : |
| Label3 Name | lblYear |
| Label3 Caption | Year Published: |
| Label4 Name | lblISBN |
| Label4 Caption | ISBN: |
| Labe5 Name | lblPubID |
| Label5 Caption | Publisher's ID: |
| Label6 Name | lblSubject |
| Label6 Caption | Subject : |
| TextBox1 Name | txtitle |
| TextBox1 DataField | Title |
| TextBox1 DataSource | adoBooks |
| TextBox2 Name | txtPub |
| TextBox2 DataField | Year Published |
| TextBox2 DataSource | adoBooks |
| TextBox3 Name | txtISBN |
| TextBox3 DataField | ISBN |
| TextBox3 DataSource | adoBooks |
| TextBox4 Name | txtPubID |
| TextBox4 DataField | PubID |
| TextBox4 DataSource | adoBooks |
| TextBox5 Name | txtSubject |
| TextBox5 DataField | Subject |
| TextBox5 DataSource | adoBooks |
| Command Button1 Name | cmdSave |
| Command Button1 Caption | Save |
| Command Button2 Name | cmdAdd |
| Command Button2 Caption | Add |
| Command Button3 Name | cmdDelete |
| Command Button3 Caption | Delete |
| Command Button4 Name | cmdCancel |
| Command Button4 Caption | Cancel |
| Command Button5 Name | cmdPrev |
| Command Button5 Caption | ≤ |
| Command Button6 Name | cmdNext |
| Command Button6 Caption | ≥ |
| Command Button7 Name | cmdExit |
| Command Button7 Caption | Exit |
To be able to access and manage a database, you need to connect the ADO data control to a database file. We are going to use BIBLIO.MDB that comes with VB6. To connect ADO to this database file , follow the steps below:
a) Click on the ADO control on the form and open up the properties window.
b) Click on the ConnectionString property, the following dialog box will appear.
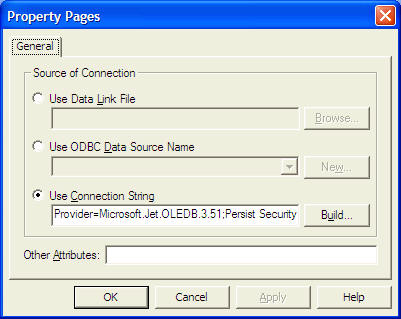
when the dialog box appear, select the Use Connection String's Option. Next, click build and at the Data Link dialog box, double-Click the option labeled Microsoft Jet 3.51 OLE DB provider.

After that, click the Next button to select the file BIBLO.MDB. You can click on Text Connection to ensure proper connection of the database file. Click OK to finish the connection.
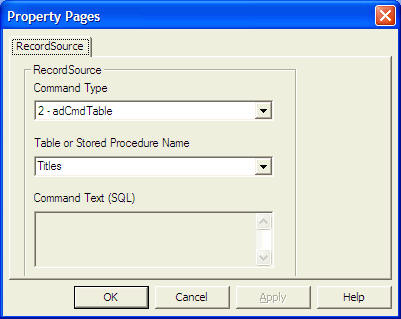
Finally, click on the RecordSource property and set the command type to adCmd Table and Table name to Titles. Now you are ready to use the database file.
For the Save button, the program code is as follow:
Private Sub cmdSave_Click()
adoBooks.Recordset.Fields("Title") = txtTitle.Text
adoBooks.Recordset.Fields("Year Published") = txtPub.Text
adoBooks.Recordset.Fields("ISBN") = txtISBN.Text
adoBooks.Recordset.Fields("PubID") = txtPubID.Text
adoBooks.Recordset.Fields("Subject") = txtSubject.Text
adoBooks.Recordset.Update
End Sub
For the Add button, the program code is as follow:
Private Sub cmdAdd_Click()
adoBooks.Recordset.AddNew
End Sub
For the Delete button, the program code is as follow:
Private Sub
cmdDelete_Click()
Confirm = MsgBox("Are you sure you want to delete this record?", vbYesNo,
"Deletion Confirmation")
If Confirm = vbYes Then
adoBooks.Recordset.Delete
MsgBox "Record Deleted!", , "Message"
Else
MsgBox "Record Not Deleted!", , "Message"
End If
End Sub
¡¡
For the Cancel button, the program code is as follow:
Private Sub cmdCancel_Click()
txtTitle.Text = ""
txtPub.Text = ""
txtPubID.Text = ""
txtISBN.Text = ""
txtSubject.Text = ""
End Sub
For the Previous (<) button, the program codes are
Private Sub cmdPrev_Click()
If Not adoBooks.Recordset.BOF Then
adoBooks.Recordset.MovePrevious
If adoBooks.Recordset.BOF Then
adoBooks.Recordset.MoveNext
End If
End If
End Sub
For the Next(>) button, the program codes are
Private Sub cmdNext_Click()
If Not adoBooks.Recordset.EOF Then
adoBooks.Recordset.MoveNext
If adoBooks.Recordset.EOF Then
adoBooks.Recordset.MovePrevious
End If
End If
End Sub
Copyright©2008 Dr.Liew Voon Kiong. All rights reserved |Contact|Privacy Policy