Designing the User Interface
Learn how to plan, customise, and build professional Windows Forms interfaces in Visual Basic 2026 — both at design-time using the Properties Window and at runtime using VB.NET code.
Me keyword and the powerful AI suggestions from GitHub Copilot.
2.1 Introduction to UI Design
Before writing a single line of code, every professional developer starts with a plan. Whether you are building a desktop game, a financial calculator, a database management tool, or a multimedia application, having a clear picture of what the interface should look like will save you hours of redesign work later.
Visual Basic 2026 follows an event-driven programming model — your application responds to things the user does (clicking buttons, typing text, selecting items). The UI you design defines what the user can do and how they interact with your program. Getting it right from the start matters.
The Two-Stage UI Development Workflow
Plan on Paper First
Sketch your form layout on paper or a whiteboard before opening Visual Studio 2026. Mark where each control (buttons, labels, text boxes) should appear. This simple habit prevents you from repeatedly rearranging controls inside the IDE and keeps your design intentional. Even a rough 2-minute sketch dramatically improves the final result.
Build in the Visual Studio 2026 IDE
Open your Windows Forms project, select the default form in the designer, and customise its properties using the Properties Window. Drag controls from the Toolbox onto the form and arrange them to match your sketch. Visual Studio 2026's snap-to-grid and alignment guides make precise positioning easy. The details will be discuss in the next section.
In Visual Studio 2026, you can open the Github Copilot Chat panel and describe your desired UI in plain English — for example, "Create a form with a title label, two text boxes for first and last name, and a Submit button" — and Copilot will generate the Windows Forms layout code for you instantly. The code and forms generated is as shown in Figure 2.1. Running the code will pop up a runtime UI as shown in Figure 2.2. When you click on the Submit button, the output will be displayed as a message box shown in Figure 2.3.
Besides that, you can choose different AI agents available, the Default agent is GPT-5 Mini.Other agents are Claude Haku 4.5, GPT-4.1, GPT 4.o.You may also bring your own model but you need to pay for it.List of providers are shown in Figure 2.0


2.2 The Properties Window
The Properties Window is the central hub for customising every aspect of your form and controls at design-time — before you run the program. You can open it at any time by pressing F4 or selecting View → Properties Window from the menu.
It is divided into three key areas:
| Area | Description | How to Use |
|---|---|---|
| Object List | Drop-down at the top showing the currently selected control or form | Click to switch between controls without clicking on the designer |
| Properties List | All configurable properties of the selected object, grouped by category or alphabetically | Click any property name on the left to edit its value on the right |
| Description Pane | Brief explanation of the currently selected property at the bottom of the window | Read this when you are unsure what a property does |
The Properties Window has two view modes toggled by the icons at the top: Categorized (groups properties by type — Appearance, Behaviour, Layout, etc.) and Alphabetical (lists all properties A–Z). Beginners often find Categorized easier to navigate.
2.3 Customising the Default Form
When you create a new Windows Forms project in Visual Basic 2026, you get a default blank form called Form1. The first thing most developers do is customise it to suit their application. Here are the most important form properties you should know:
| Property | Suggested Value | Effect |
|---|---|---|
| Name | MyForm | The identifier used to reference this form in code. Use a meaningful name. |
| Text | My First VB 2026 Program | The text shown in the form's title bar. |
| BackColor | LavenderBlush | The background colour of the form's client area. |
| ForeColor | Crimson | The default text colour for controls placed on the form. |
| Font | Arial, 10pt | The default font inherited by controls on the form. |
| MaximizeBox | False | Hides or disables the maximise button on the title bar. |
| StartPosition | CenterScreen | Where the form appears when the program starts — centred on the monitor. |
| FormBorderStyle | FixedSingle | Prevents the user from resizing the form by dragging its edges. |
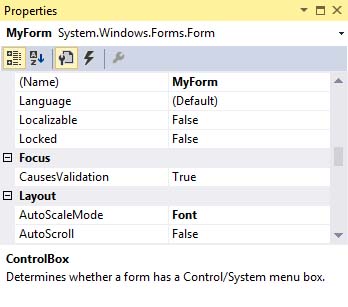
Interactive Properties Demo
Below is a representation of how the Properties Window looks after customising Form1 for a simple application. Properties that have been changed from their defaults are highlighted:
Choosing Colours
When you click on a colour property such as BackColor or ForeColor, Visual Studio 2026 opens a colour picker with three tabs:


2.4 Changing Form Properties at Runtime
Setting properties in the Properties Window works perfectly for fixed designs. But sometimes you want properties to change while the program is running — for example, changing the background colour when a user clicks a button, or resizing the form based on a user's preference. This is called runtime property modification, and it is done through VB.NET code.
In code, the current form is always referred to using the Me keyword. Think of Me as the form saying "I" — Me.BackColor means "my background colour".
Me is a special Visual Basic keyword that refers to the current instance of the form in which the code is written. You use it to access and modify the form's own properties and methods from within its own event handlers and procedures.
Example 2.1 — Setting Form Properties on Load
The most common place to set runtime properties is in the Form_Load event — code that runs automatically as soon as the form opens. Double-click on an empty area of the form in the designer to create this event handler:
Public Class Form1

    Private Sub Form1_Load(sender As Object, e As EventArgs) Handles MyBase.Load

        ' Set the title bar text
        Me.Text = "My First VB 2026 Program"

        ' Set the background colour
        Me.BackColor = Color.LavenderBlush

        ' Set the default text colour
        Me.ForeColor = Color.Crimson

        ' Disable the maximise button
        Me.MaximizeBox = False

        ' Keep the minimise button enabled
        Me.MinimizeBox = True

    End Sub

End Class
Setting a property in the Properties Window and setting it in code both produce the same result visually — but code gives you flexibility. You can change properties conditionally, based on user input, or in response to events. Properties set in code also override anything set in the Properties Window.
Example 2.2 — Advanced Form Customisation
This example demonstrates additional runtime properties including form size, opacity, and screen positioning — all available as first-class properties in Visual Basic 2026:
Public Class Form1

    Private Sub Form1_Load(sender As Object, e As EventArgs) Handles MyBase.Load

        ' Title bar text
        Me.Text = "My First VB 2026 Project"

        ' Background colour
        Me.BackColor = Color.Beige

		' Foreground colour
        Me.ForeColor = Color.Red

        ' Disable maximise button
        Me.MaximizeBox = False
        Me.MinimizeBox = True

        ' Set the form size to 500 x 400 pixels
        Me.Size = New Size(500, 400)

        ' Set form opacity to 90% (slightly transparent)
        Me.Opacity = 0.9

        ' Centre the form on the user's screen
        Me.CenterToScreen()

        ' Prevent the user from resizing the form
        Me.FormBorderStyle = FormBorderStyle.FixedSingle

    End Sub

End Class

2.5 Common Runtime Form Properties
Here is a complete reference of the most useful form properties you can set at runtime in Visual Basic 2026:
| Property | Data Type | Example Value | Description |
|---|---|---|---|
| Me.Text | String | "My App" |
Title bar caption |
| Me.BackColor | Color | Color.Cyan |
Form background colour |
| Me.ForeColor | Color | Color.DarkBlue |
Default text colour for controls |
| Me.Font | Font | New Font("Arial", 12) |
Default font for the form |
| Me.Size | Size | New Size(800, 600) |
Width and height in pixels |
| Me.Opacity | Double | 0.85 |
Transparency (0.0 = invisible, 1.0 = fully opaque) |
| Me.MaximizeBox | Boolean | False |
Show/hide the maximise button |
| Me.MinimizeBox | Boolean | True |
Show/hide the minimise button |
| Me.FormBorderStyle | FormBorderStyle | FormBorderStyle.FixedSingle |
Controls resize behaviour and border appearance |
| Me.TopMost | Boolean | True |
Keeps form on top of all other windows |
| Me.CenterToScreen() | Method | Me.CenterToScreen() |
Centres the form on the primary display |
| Me.Close() | Method | Me.Close() |
Closes the form and ends the application |
2.6 Using GitHub Copilot to Design Your UI
Visual Studio 2026 ships with deep GitHub Copilot integration that makes UI design faster than ever. Here are three practical ways to use Copilot specifically for designing forms in Visual Basic 2026:
1. Generate Form Properties Code from a Comment
Type a comment describing what you want, press Enter, and Copilot suggests the code:
' Create a dark-themed form, 600x400, centred on screen, non-resizable
' ↓ Copilot generates all of the following automatically:
Me.BackColor = Color.FromArgb(30, 30, 30)
Me.ForeColor = Color.White
Me.Size = New Size(600, 400)
Me.CenterToScreen()
Me.FormBorderStyle = FormBorderStyle.FixedSingle
Me.Text = "Dark Theme App"
2. Ask Copilot Chat to Explain a Property
If you see a property in the Properties Window that you do not understand — for example ImeMode or KeyPreview — open Copilot Chat (View → GitHub Copilot Chat) and ask: "What does the KeyPreview property do on a Windows Form?". Copilot explains it in plain English with an example.
3. Let Copilot Suggest Appropriate Colours
Ask the Copilot Chat: "What background and foreground colour combinations work well for a professional business application in VB.NET?" — Copilot will suggest colour pairings with good contrast ratios and provide the exact Color values to paste into your code.
Always ensure sufficient contrast between your BackColor and ForeColor choices. The Web Content Accessibility Guidelines (WCAG) recommend a minimum contrast ratio of 4.5:1 for normal text. Visual Studio 2026's Copilot can check this for you if you ask.
📘 Lesson Summary
- Always plan your UI on paper before opening the IDE — even a rough sketch saves redesign time.
- The Properties Window (F4) is your design-time hub for customising every form and control property.
- Key form properties include Text (title bar), BackColor, ForeColor, Font, Size, MaximizeBox, and StartPosition.
- The
Mekeyword refers to the current form in code, allowing you to modify properties at runtime. - The Form_Load event is the ideal place to set runtime properties — it fires automatically when the form opens.
Me.Size,Me.Opacity, andMe.CenterToScreen()give you fine-grained control over the form's appearance and position.- Runtime property changes override anything set in the Properties Window at design-time.
- GitHub Copilot in Visual Studio 2026 can generate form setup code from plain-English comments and explain unfamiliar properties on demand.
Related Resources
← Lesson 1
Introduction to Visual Basic 2026 and the Visual Studio 2026 IDE.
Visual Studio 2026
Download the free Community Edition and explore what's new in VS 2026.
VB Sample Code
Practical VB.NET code examples including Windows Forms UI projects.
WinForms Docs
Official Microsoft documentation for Windows Forms in .NET.
Featured Books

Visual Basic 2022 Made Easy
The ultimate beginner-friendly guide to Windows Forms development with Visual Basic — clear, step-by-step, and beginner-accessible.
View on Amazon →
Visual Basic 2026 Made Easy
48 fully-explained code examples spanning VB6 through VB.NET — ideal for building real-world applications.
View on Amazon →