Lesson 3: Enhancing the UI in VB2022
Master the Toolbox and UI design techniques to create professional applications with multiple controls
Key Takeaway
Mastering the Toolbox and UI design techniques is essential for creating professional VB2022 applications. This lesson teaches you how to work with essential controls like PictureBox, Buttons, and Labels to create visually appealing and functional interfaces.
Welcome to Lesson 3 of our Visual Basic 2022 Tutorial! In this lesson, you'll learn how to enhance your VB2022 applications by mastering the Toolbox and UI design techniques. We'll cover everything from accessing the Toolbox to creating professional interfaces with multiple controls.
3.1 Mastering the Toolbox
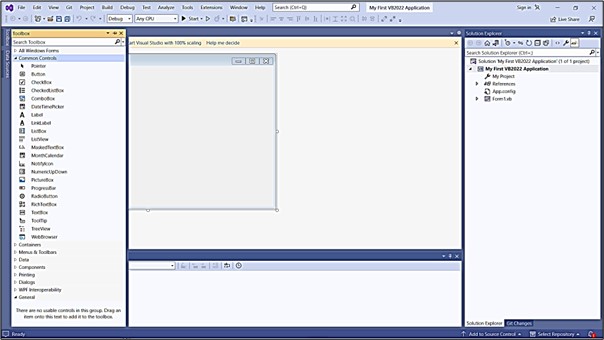
The Toolbox is your primary resource for adding controls to your VB2022 applications. By default, it might be hidden when you start Visual Basic 2022. Here's how to access and work with it:
Remember
The Toolbox contains all the controls you'll use to build your application's interface. Familiarizing yourself with it is essential for efficient development.
1 Accessing the Toolbox
Click View on the menu bar and select Toolbox. Alternatively, use the shortcut keys Ctrl+Alt+x.
2 Docking and Positioning
You can drag and dock the Toolbox anywhere in the IDE. It's commonly docked at the left of the IDE window for easy access.
3 Changing Position
Right-click the Toolbox and choose Dock from the pop-up menu to change its position. You can also pin it to the sidebar or bottom bar using the pin icon.
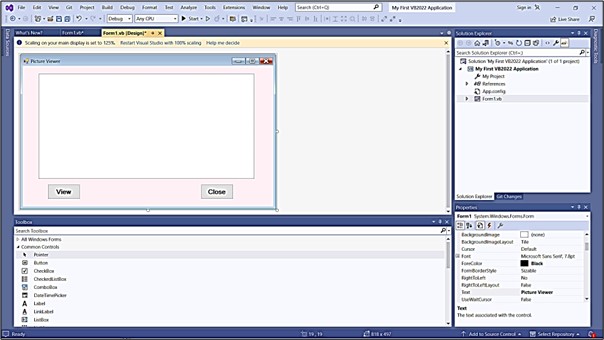
3.2 Creating a Picture Viewer UI
Let's design a practical application to demonstrate UI enhancement techniques. We'll create a Picture Viewer with these components:
| Control | Property | Value |
|---|---|---|
| Form | Text | "Picture Viewer" |
| BackColor | #f0f8ff | |
| PictureBox | Name | picViewer |
| BackColor | White | |
| SizeMode | StretchImage | |
| Button1 | Text | "View" |
| BackColor | LightBlue | |
| Name | btnView | |
| Button2 | Text | "Close" |
| BackColor | LightCoral | |
| Name | btnClose |
Pro Tip
Use the Anchor property to make controls resize properly when the form is resized. For the PictureBox, set Anchor to Top, Bottom, Left, and Right.
3.3 Building a Professional Login Form
Let's create a more complex UI with multiple controls. We'll design a professional login form with these elements:
Public Class LoginForm
    Private Sub LoginForm_Load(sender As Object, e As EventArgs) Handles MyBase.Load
        ' Form setup
        Me.Text = "System Login"
        Me.StartPosition = FormStartPosition.CenterScreen
        Me.FormBorderStyle = FormBorderStyle.FixedDialog

        ' Label setup
        lblUsername.Text = "Username:"
        lblUsername.Font = New Font(lblUsername.Font, FontStyle.Bold)

        lblPassword.Text = "Password:"
        lblPassword.Font = New Font(lblPassword.Font, FontStyle.Bold)

        ' Textbox setup
        txtPassword.PasswordChar = "*"

        ' Button setup
        btnLogin.BackColor = Color.LightGreen
        btnCancel.BackColor = Color.LightSalmon
    End Sub

    Private Sub btnLogin_Click(sender As Object, e As EventArgs) Handles btnLogin.Click
        ' Authentication logic would go here
        MessageBox.Show("Login attempt processed")
    End Sub
End Class
Output:

3.4 Creating a Settings Panel
This example demonstrates grouping related controls for better organization:
1 GroupBox Setup
Add a GroupBox with Text = "Display Settings"
2 Checkboxes
Inside the GroupBox:
- CheckBox1:
Text= "Show Toolbar" - CheckBox2:
Text= "Show Status Bar" - CheckBox3:
Text= "Remember Window Size"
3 Radio Buttons
Add another GroupBox with Text = "Theme"
- RadioButton1:
Text= "Light",Checked= True - RadioButton2:
Text= "Dark" - RadioButton3:
Text= "Blue"

Design Tip
Group related controls using GroupBox or Panel containers. This improves organization and makes your UI more intuitive for users.
3.5 UI Design Best Practices
Follow these guidelines to create professional, user-friendly interfaces:
Consistency
Maintain consistent sizing, spacing, and coloring throughout your application
Alignment
Use the alignment tools in the Layout toolbar to perfectly align controls
Tab Order
Set logical tab order using View > Tab Order
Accessibility
Set AccessibleName and AccessibleDescription properties for screen readers
Lesson Summary
In this lesson, we covered essential techniques for enhancing VB2022 user interfaces:
Toolbox Mastery
Learned to access, position, and use the Toolbox effectively
Practical UI Examples
Created Picture Viewer, Login Form, and Settings Panel interfaces
Control Grouping
Used GroupBox containers to organize related controls
Best Practices
Learned UI design principles for professional applications
These skills form the foundation for creating visually appealing and user-friendly applications in VB2022. In the next lesson, we'll explore how to write code to make these interfaces functional.
Exercises
Practice what you've learned with these exercises:
Exercise 1: Personal Information Form
Create a form that collects personal information with these controls:
- Labels for First Name, Last Name, Email, and Phone Number
- Corresponding TextBoxes for each field
- A GroupBox titled "Gender" with RadioButtons for Male, Female, and Other
- A DateTimePicker for birth date
- Buttons for "Submit" and "Clear"
Exercise 2: Calculator Interface
Design a calculator interface with these elements:
- A TextBox at the top for displaying results
- Number buttons (0-9)
- Operator buttons (+, -, ×, ÷)
- Special function buttons (C, CE, =)
- Organize buttons in a logical grid layout
Exercise 3: Enhance the Picture Viewer
Improve the Picture Viewer we created earlier by adding:
- A MenuStrip with File > Open and File > Exit options
- A StatusStrip at the bottom showing image dimensions
- A TrackBar for zooming functionality
- RadioButtons for different size modes (Normal, Stretch, Zoom, AutoSize)
Next Lesson
Ready to learn how to make your UI functional? Continue to Lesson 4: Writing the Code.
Related Resources

Visual Basic 2022 Made Easy
The ultimate beginner-friendly guide for mastering Windows-based application development using Visual Basic in Visual Studio 2022. Whether you're a student, teacher, hobbyist, or self-learner, this book offers a clear, step-by-step approach to help you get started with ease.
What You'll Learn:
- Introduction to the Visual Studio 2022 IDE
- Working with variables, data types, loops, and procedures
- Designing forms and creating user-friendly interfaces
- Using controls such as buttons, text boxes, and combo boxes
- Menus, dialog boxes, file handling, and more

Mastering Excel VBA 365
Your ultimate step-by-step guide to automating tasks, building macros, and creating powerful applications within Microsoft Excel 365. Whether you're a student, business professional, or aspiring programmer, this comprehensive handbook will help you unlock the full potential of Excel's VBA.
What You'll Learn:
- Write and debug efficient VBA code
- Use controls, loops, and conditional logic
- Automate repetitive Excel tasks
- Handle errors and create UserForms
- Work with Excel objects and charts