Lesson 5: Working with Controls in VB2022
Mastering TextBox and Label Controls for Effective User Interaction
Key Takeaway
Textbox and Label controls are fundamental building blocks of VB2022 applications. TextBox controls handle user input and output, while Labels provide context and display information. Mastering these controls is essential for creating intuitive and functional interfaces.
Welcome to Lesson 5 of our Visual Basic 2022 Tutorial! In this lesson, you'll learn how to effectively work with TextBox and Label controls. These essential components allow you to create applications that accept user input, display results, and provide clear user guidance.
Learning Objectives
- Understand TextBox and Label properties and methods
- Implement input validation techniques
- Convert between text and numeric data types
- Create dynamic user interfaces with controls
- Design practical applications using TextBox and Label
TextBox Control
The TextBox control serves dual purposes: accepting user input and displaying output. While it primarily handles string data, it can also work with numeric values when properly converted.
Key properties:
- Text: Gets or sets the text content
- Multiline: Enables multiple lines of text
- PasswordChar: Masks input with a specified character
- ReadOnly: Prevents user editing
- MaxLength: Limits input length
Label Control
The Label control is primarily used for displaying static text to users. Unlike the TextBox, Labels are read-only and cannot be edited by users at runtime.
Key properties:
- Text: The displayed content
- Font: Controls text appearance
- ForeColor: Text color
- BackColor: Background color
- AutoSize: Automatically adjusts size to content
Important Note
Always convert text to numeric values using the Val() function before performing mathematical operations. Without conversion, numbers will be treated as strings and concatenated rather than added.
5.1 Basic Calculator with TextBox
Let's create a simple addition calculator using TextBox controls. This example demonstrates how to accept user input, convert text to numbers, perform calculations, and display results.
1 Implementation Steps
- Add two TextBox controls to your form
- Add a Button control and change its text to "ADD"
- Double-click the button to create the Click event handler
2 Code Example
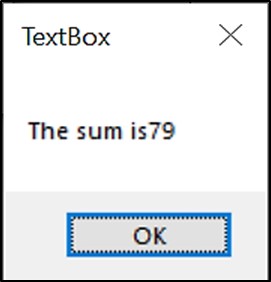
Private Sub Button1_Click(sender As Object, e As EventArgs) Handles Button1.Click
    ' Convert text to numbers and add them
    Dim sum As Double = Val(TextBox1.Text) + Val(TextBox2.Text)

    ' Display the result in a message box
    MsgBox("The sum is " & sum)
End Sub
Behavior: This program adds the values from both text boxes and displays the result in a message box.

Understanding Val()
The Val() function converts a string to a numeric value. Without it, the plus operator would concatenate the text values instead of performing arithmetic addition.
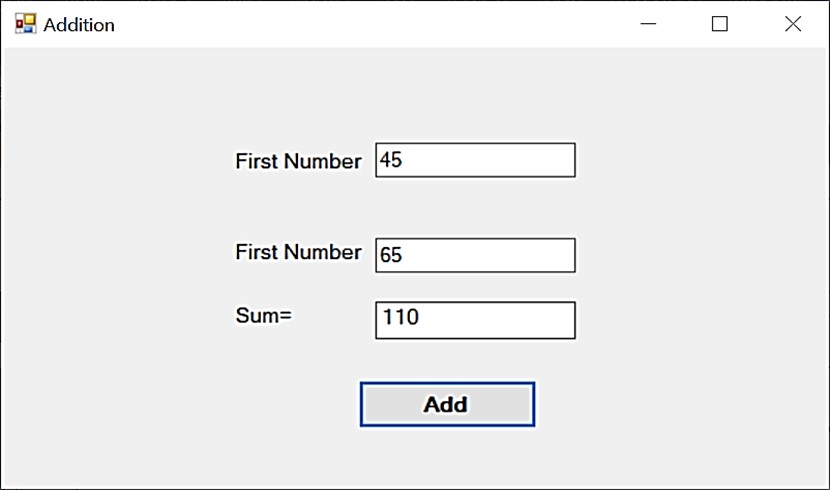
5.2 Enhanced Calculator with Labels
Let's improve our calculator by adding Label controls for a better user experience. Labels provide context and display results without interrupting the user with message boxes.
1 Implementation Steps
- Add two Label controls to your form
- Set the first Label's Text to "Sum ="
- Set its Font to Bold and Size to 10
- Clear the second Label's Text property
- Set its Font to Bold, Size to 10, and BackColor to White
2 Code Example
Private Sub Button1_Click(sender As Object, e As EventArgs) Handles Button1.Click
    ' Convert text to numbers and add them
    Dim result As Double = Val(TextBox1.Text) + Val(TextBox2.Text)

    ' Display the result in the label
    LblSum.Text = result.ToString()
End Sub
Behavior: When the button is clicked, the sum is displayed in the label instead of a message box.
5.3 Input Validation with TextBox
Validating user input is crucial for creating robust applications. This example demonstrates how to validate input and provide feedback to users.
Private Sub BtnVerify_Click(sender As Object, e As EventArgs) Handles BtnVerify.Click
    ' Check if input is numeric
    If Not IsNumeric(TxtAge.Text) Then
        LblResult.Text = "Please enter a valid number!"
        LblResult.ForeColor = Color.Red
        Return
    End If

    ' Convert to number
    Dim age As Integer = CInt(TxtAge.Text)

    ' Validate age range
    If age < 0 Or age > 120 Then
        LblResult.Text = "Please enter a realistic age!"
        LblResult.ForeColor = Color.Red
    ElseIf age >= 18 Then
        LblResult.Text = "Access granted. Welcome!"
        LblResult.ForeColor = Color.Green
    Else
        LblResult.Text = "Access denied. You must be 18 or older."
        LblResult.ForeColor = Color.Red
    End If
End Sub
Output:
This example demonstrates:
- Using
IsNumeric()to validate input - Converting text to integer with
CInt() - Implementing range validation
- Dynamically changing Label properties (text and color)
5.4 Dynamic Content with Labels
Labels can display dynamic content based on user input or system information. This example creates a personalized greeting.
Private Sub BtnGreet_Click(sender As Object, e As EventArgs) Handles BtnGreet.Click
    ' Get current time
    Dim currentTime As DateTime = DateTime.Now
    Dim hour As Integer = currentTime.Hour

    ' Determine time of day
    Dim timeOfDay As String
    If hour < 12 Then
        timeOfDay = "morning"
    ElseIf hour < 18 Then
        timeOfDay = "afternoon"
    Else
        timeOfDay = "evening"
    End If

    ' Create personalized greeting
    Dim greeting As String = $"Good {timeOfDay}, {TxtName.Text}!"

    ' Display greeting and current time
    LblGreeting.Text = greeting
    LblTime.Text = $"Current time: {currentTime.ToString("hh:mm tt")}"
End Sub
Output:
This example shows:
- Working with DateTime functions
- Using string interpolation for dynamic text
- Displaying multiple pieces of information in labels
- Creating personalized user experiences
Lesson Summary
In this lesson, we covered essential techniques for working with TextBox and Label controls in VB2022:
TextBox Fundamentals
Essential for user input and can display both text and numeric data
Data Conversion
Always convert TextBox values using Val() or CInt() before mathematical operations
Label Usage
Read-only controls perfect for displaying information to users
Dynamic Properties
Change Label properties (text, color, visibility) at runtime
Input Validation
Crucial when working with TextBox controls to ensure data integrity
These skills form the foundation for creating user-friendly interfaces in VB2022. In the next lesson, we'll explore how to work with ListBox and ComboBox controls.
Exercises
Practice what you've learned with these exercises:
Exercise 1: BMI Calculator
Create a BMI calculator with:
- Textboxes for height (in cm) and weight (in kg)
- A "Calculate" button
- A Label to display the BMI result
Formula: BMI = weight / (height/100)^2
Exercise 2: Login Form
Create a login form with:
- Textboxes for username and password
- A "Login" button
- A Label for validation messages
When the button is clicked, validate that both fields are filled. Display appropriate messages.
Exercise 3: Currency Converter
Create a currency converter that:
- Converts USD to EUR (use 0.85 as conversion rate)
- Uses a TextBox for USD input
- Displays the EUR result in a Label
- Has a "Convert" button
Next Lesson
Ready to learn about more advanced controls? Continue to Lesson 6: Working with ListBox and ComboBox.
Related Resources

Visual Basic 2022 Made Easy
The ultimate beginner-friendly guide for mastering Windows-based application development using Visual Basic in Visual Studio 2022. Whether you're a student, teacher, hobbyist, or self-learner, this book offers a clear, step-by-step approach to help you get started with ease.
What You'll Learn:
- Introduction to the Visual Studio 2022 IDE
- Working with variables, data types, loops, and procedures
- Designing forms and creating user-friendly interfaces
- Using controls such as buttons, text boxes, and combo boxes
- Menus, dialog boxes, file handling, and more

Mastering Excel VBA 365
Your ultimate step-by-step guide to automating tasks, building macros, and creating powerful applications within Microsoft Excel 365. Whether you're a student, business professional, or aspiring programmer, this comprehensive handbook will help you unlock the full potential of Excel's VBA.
What You'll Learn:
- Write and debug efficient VBA code
- Use controls, loops, and conditional logic
- Automate repetitive Excel tasks
- Handle errors and create UserForms
- Work with Excel objects and charts