Creating a Database Application in VB6
Learn to connect to databases, browse records, and create professional database interfaces
Lesson Overview
Key Takeaway
Visual Basic provides powerful database capabilities through the Data Control, allowing you to create professional database applications without complex coding.
Welcome to Lesson 23 of our Visual Basic 6 Tutorial! In this lesson, you'll learn how to create database applications using VB6's built-in Data Control. We'll connect to the NWIND.MDB sample database, browse customer records, and create a professional database interface.
23.1 Creating Simple Database Application
Visual Basic provides the capability to effectively manage databases created with various database programs, including MS Access, Oracle, MySQL, and more. In this lesson, our focus is not on database file creation, but rather on accessing database files within the VB environment.
Database Connectivity
Connect to Access, SQL Server, Oracle, and other databases
Record Navigation
Browse through records with intuitive navigation controls
Professional UI
Create clean, professional database interfaces
23.1.1 Required Components
To create a database browser application, we need these essential components:
1Data Control
The core component for database connectivity
2Database File
NWIND.MDB sample database included with VB6
3Labels
To display field names and data values
4Binding
Connecting controls to database fields

23.2 Connecting Data Control to Database
To connect the data control to a database, we need to configure its properties:
1DatabaseName Property
Specify the path to NWIND.MDB database file
2RecordSource Property
Select the Customers table from the database
3Control Binding
Connect labels to specific fields in the table


23.2.1 Property Configuration
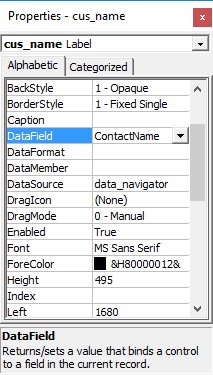
The next step is to double-click on the RecordSource property to select the customers table from the database file NWIND.MDB, as shown in Figure 23.4. You can also change the caption of the data control to anything. After that, we will place a label and change its caption to Customer Name. In addition, insert another label and name it as cus_name and leave the label empty as customers' names will appear here when we click the arrows on the data control.
DataSource Property
Set to the Data Control name (data_navigator)
DataField Property
Set to the specific field (ContactName)
RecordSource
Set to the Customers table

23.3 Running the Application
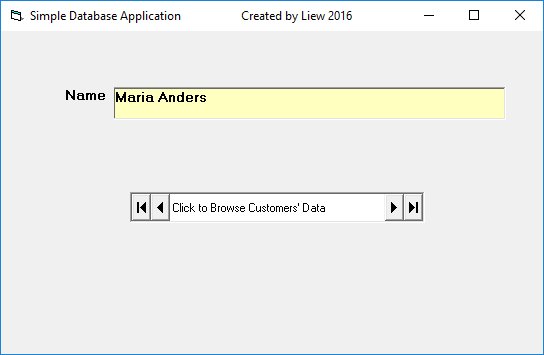
Now, press F5 and run the program. You should be able to browse all the customers' names by clicking the arrows on the data control, as shown in Figure 23.7.

Interactive Database Browser
Try browsing customer records using the navigation buttons:
23.4 Creating Professional Interfaces
You can add other fields using exactly the same method. For example, you can add title, company, address, City, postcode, telephone number and more to the database browser. Besides, you can design a more professional interface, as shown in Figure 23.8.

Lesson Summary
In this lesson, you've learned how to create a database application in VB6:
Data Control Setup
Configuring DatabaseName and RecordSource properties
Control Binding
Connecting labels to database fields
Record Navigation
Browsing records with the Data Control
Professional UI
Creating clean database interfaces
Important Note
The NWIND.MDB database file is typically located in the Microsoft Visual Studio\VB98\ directory. If you can't find it, you may need to install the sample databases that come with VB6.
Practice Exercises
Enhance your database application with these exercises:
Exercise 1: Add More Fields
Display additional customer information like address, city, and phone number.
Exercise 2: Search Functionality
Implement a search box to find customers by name.
Exercise 3: Multiple Tables
Connect to the Orders table and display order history.
Exercise 4: Data Grid
Use the DataGrid control to show multiple records at once.
Exercise 5: Edit Records
Add functionality to edit and update customer information.
Next Lesson
Continue your VB6 journey with Lesson 24: Advanced Database Techniques.
Related Resources

Visual Basic 6 Made Easy
Start your programming journey with Visual Basic 6. Learn how to build Windows applications step-by-step using an easy and beginner-friendly approach.
- Perfect for beginners
- Learn core programming concepts
- Build real VB6 applications

Visual Basic 2026 Made Easy
Upgrade to modern Visual Basic with VB.NET, .NET 10, and Visual Studio 2026. Build real-world applications with modern tools and AI-powered development.
- Modern VB.NET development
- Hands-on projects and real apps
- GitHub Copilot & AI integration
🚀 Ready for the Next Level?
After learning the basics with VB6 Made Easy and upgrading to VB2026 Made Easy, continue your journey into advanced professional development.

Advanced VB.NET Programming
Take your VB.NET skills to the next level. Learn advanced programming techniques, real-world architectures, and professional development practices using modern .NET.
Best For:
- After VB6 or VB.NET fundamentals
- Intermediate to advanced learners
- Developers building real-world systems
🚀 Migrating from VB6 to VB.NET
Still using or learning classic Visual Basic 6? This practical step-by-step guide shows you how to migrate legacy VB6 applications to modern VB.NET with Visual Studio 2026 and .NET 10.

VB6 to Modern VB.NET Made Easy
A practical step-by-step guide to migrating legacy Visual Basic 6 applications to VB.NET with Visual Studio 2026 and .NET 10.
- Designed for VB6 programmers and legacy app maintainers
- Clear migration guidance from classic VB to modern .NET
- Perfect bridge between VB6 fundamentals and VB.NET development
🚀 Move to Modern VB.NET
Visual Basic 6 is your foundation — but modern development uses VB.NET with .NET and Visual Studio 2026.
Start VB.NET Tutorial →