Lesson 5: Working with Controls in VB2019
Learn to effectively use TextBox and Label controls to create interactive applications
Key Takeaway
Mastering the use of controls like TextBox and Label is fundamental to creating interactive Visual Basic applications. This lesson teaches you how to accept user input, display results, and create practical applications like calculators.
In Visual Basic 2019, controls are the building blocks of your application's user interface. Understanding how to work with these controls programmatically is essential for creating functional applications. This lesson focuses on two essential controls: TextBox and Label.
5.1 Understanding VB2019 Controls
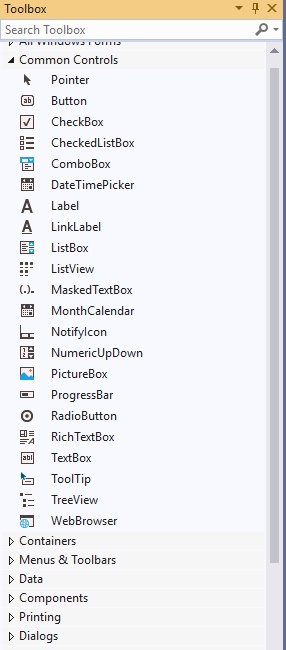
Visual Basic 2019 provides a wide variety of controls that you can use to build applications. These controls are organized into several categories in the Toolbox:
Common Controls
Buttons, labels, textboxes, and other frequently used UI elements
Containers
GroupBox, Panel, TabControl for organizing other controls
Menus & Toolbars
MenuStrip, ToolStrip for application navigation
Data Controls
DataGridView, BindingSource for database interaction
5.2 The TextBox Control
The TextBox control is essential for accepting user input and displaying output. It can handle both string and numeric data, making it versatile for various applications.
TextBox Properties
| Property | Description |
|---|---|
| Text | The text content displayed in the TextBox |
| Multiline | Enables multiple lines of text |
| PasswordChar | Displays a character instead of actual text for passwords |
| ReadOnly | Prevents user from modifying the content |
| MaxLength | Maximum number of characters allowed |
Example 5.1: Simple Addition with TextBox
This example demonstrates how to use TextBox controls to accept numeric input and display the result in a message box.
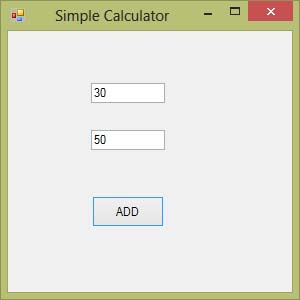
The code behind the Add button:
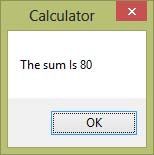
Private Sub Button1_Click(sender As Object, e As EventArgs) Handles Button1.Click
    ' Convert text input to numbers and calculate sum
    Dim num1 As Single = Val(TextBox1.Text)
    Dim num2 As Single = Val(TextBox2.Text)
    Dim sum As Single = num1 + num2

    ' Display the result in a message box
    MsgBox("The sum is " & sum)
End Sub
Output:
Important Notes
Val() Function: Converts a string to a numeric value. Essential when working with TextBox inputs for calculations.
String Concatenation: The & operator combines strings and numeric values for display.
5.3 The Label Control
Labels are primarily used to display static text, provide instructions, or show output. Unlike TextBoxes, users cannot edit Label content directly.
Label Properties
| Property | Description |
|---|---|
| Text | The text displayed on the label |
| AutoSize | Automatically adjusts size to fit content |
| TextAlign | Alignment of text within the label |
| BorderStyle | Adds a border around the label |
| BackColor | Background color of the label |
Example 5.2: Simple Calculator with Label
This example creates a calculator that adds two numbers and displays the result in a Label control instead of a message box.
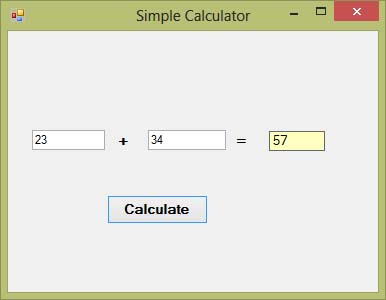
The code behind the Calculate button:
Public Class Form1
    Private Sub BtnCal_Click(sender As Object, e As EventArgs) Handles BtnCal.Click
        ' Declare variables to store numbers
        Dim num1 As Single = Val(TxtNum1.Text)
        Dim num2 As Single = Val(TxtNum2.Text)

        ' Calculate the sum
        Dim Sum As Single = num1 + num2

        ' Display the result in the label
        LblAns.Text = Sum.ToString()
    End Sub
End Class
Output:
Important Notes
Variable Declaration: The Dim keyword declares variables to store numeric values.
ToString() Method: Converts numeric values to strings for display in the Label control.
Naming Conventions: Notice the use of prefixes (Txt, Lbl, Btn) for control names to make code more readable.
Interactive Calculator Preview
Try this interactive calculator simulation to understand how the controls work together:
Lesson Summary
In this lesson, you've learned how to effectively work with TextBox and Label controls:
TextBox Control
Accept user input and display output using TextBox controls
Label Control
Display static text, instructions, and calculation results
Numeric Conversion
Use Val() to convert text input to numeric values
Practical Application
Create a functional calculator using TextBox and Label controls
You've learned how to work with two fundamental controls to create interactive applications. In the next lesson, we'll explore more advanced controls: ListBox and ComboBox.
Next Lesson
Ready to learn about list-based controls? Continue to Lesson 6: ListBox and ComboBox.
Related Resources
Visual Basic 2019 Made Easy
Unlock the power of Visual Basic 2019 with this comprehensive, easy-to-follow handbook written by Dr. Liew, renowned educator and founder of the popular programming tutorial website VBtutor.net. Whether you're new to programming or brushing up your skills, this book is your perfect companion to learn Visual Basic 2019 from the ground up.
What You'll Learn:
- Understand Core Programming Concepts: Grasp the foundational principles of Visual Basic 2019, including variables, data types, conditional logic, loops, and event-driven programming.
- Develop Real Windows Desktop Applications: Build fully functional and interactive Windows apps using Visual Studio 2019—guided through step-by-step tutorials.
- Apply Dozens of Ready-to-Use Examples: Explore a rich collection of practical sample programs, from basic calculators to image viewers and database applications.
- Adapt and Reuse Code for Your Own Projects: Customize professionally written code snippets to speed up your development process and bring your ideas to life.
- Package and Deploy Like a Pro: Learn how to compile, test, and distribute your Visual Basic applications seamlessly with built-in deployment tools.

Visual Basic Programming With Code Examples
Visual Basic Programming with Code Examples offers a unique dual-format approach, showcasing sample codes in both Visual Basic 6 (VB6) and VB.NET. This side-by-side presentation helps you understand the evolution of Visual Basic and empowers you to work confidently across both environments.
What You'll Learn:
- Core Concepts Made Easy: Explore data types, control structures, file handling, procedures, user interface design, and more.
- Hands-On Application Building: Design real-world applications, including financial calculators, educational tools, games, multimedia apps, and database systems.
- 48 Practical Code Examples: Study and customize fully explained programs that illustrate key programming techniques.
- Dual-Code Format: Learn to translate and adapt code between VB6 and VB.NET seamlessly.