Creating Visual Basic 6 Applications
Learn how to create your first VB6 application, write event procedures, display output, perform calculations, join strings, and build a simple color-changing app.
Lesson Overview
Key Takeaway
Creating a VB6 application involves two main tasks: designing the user interface and writing event-driven code that responds to user actions.
Welcome to Lesson 2 of our Visual Basic 6 Tutorial. In this lesson, you will learn how to create a simple VB6 application from scratch, open the code window, write basic instructions, and build a small interactive program.
2.1 Creating Your First Application
Start Microsoft Visual Basic 6 and choose Standard EXE from the New Project dialog. VB6 will create a default form named Form1. This form is the main window of your first application.
1 Launch the VB6 IDE
Open Visual Basic 6 and select Standard EXE. The Integrated Development Environment displays a form, toolbox, project explorer, properties window, and code editor.
2 Open the Code Window
Double-click Form1 to open its code window. This is where you write instructions that run when events occur.
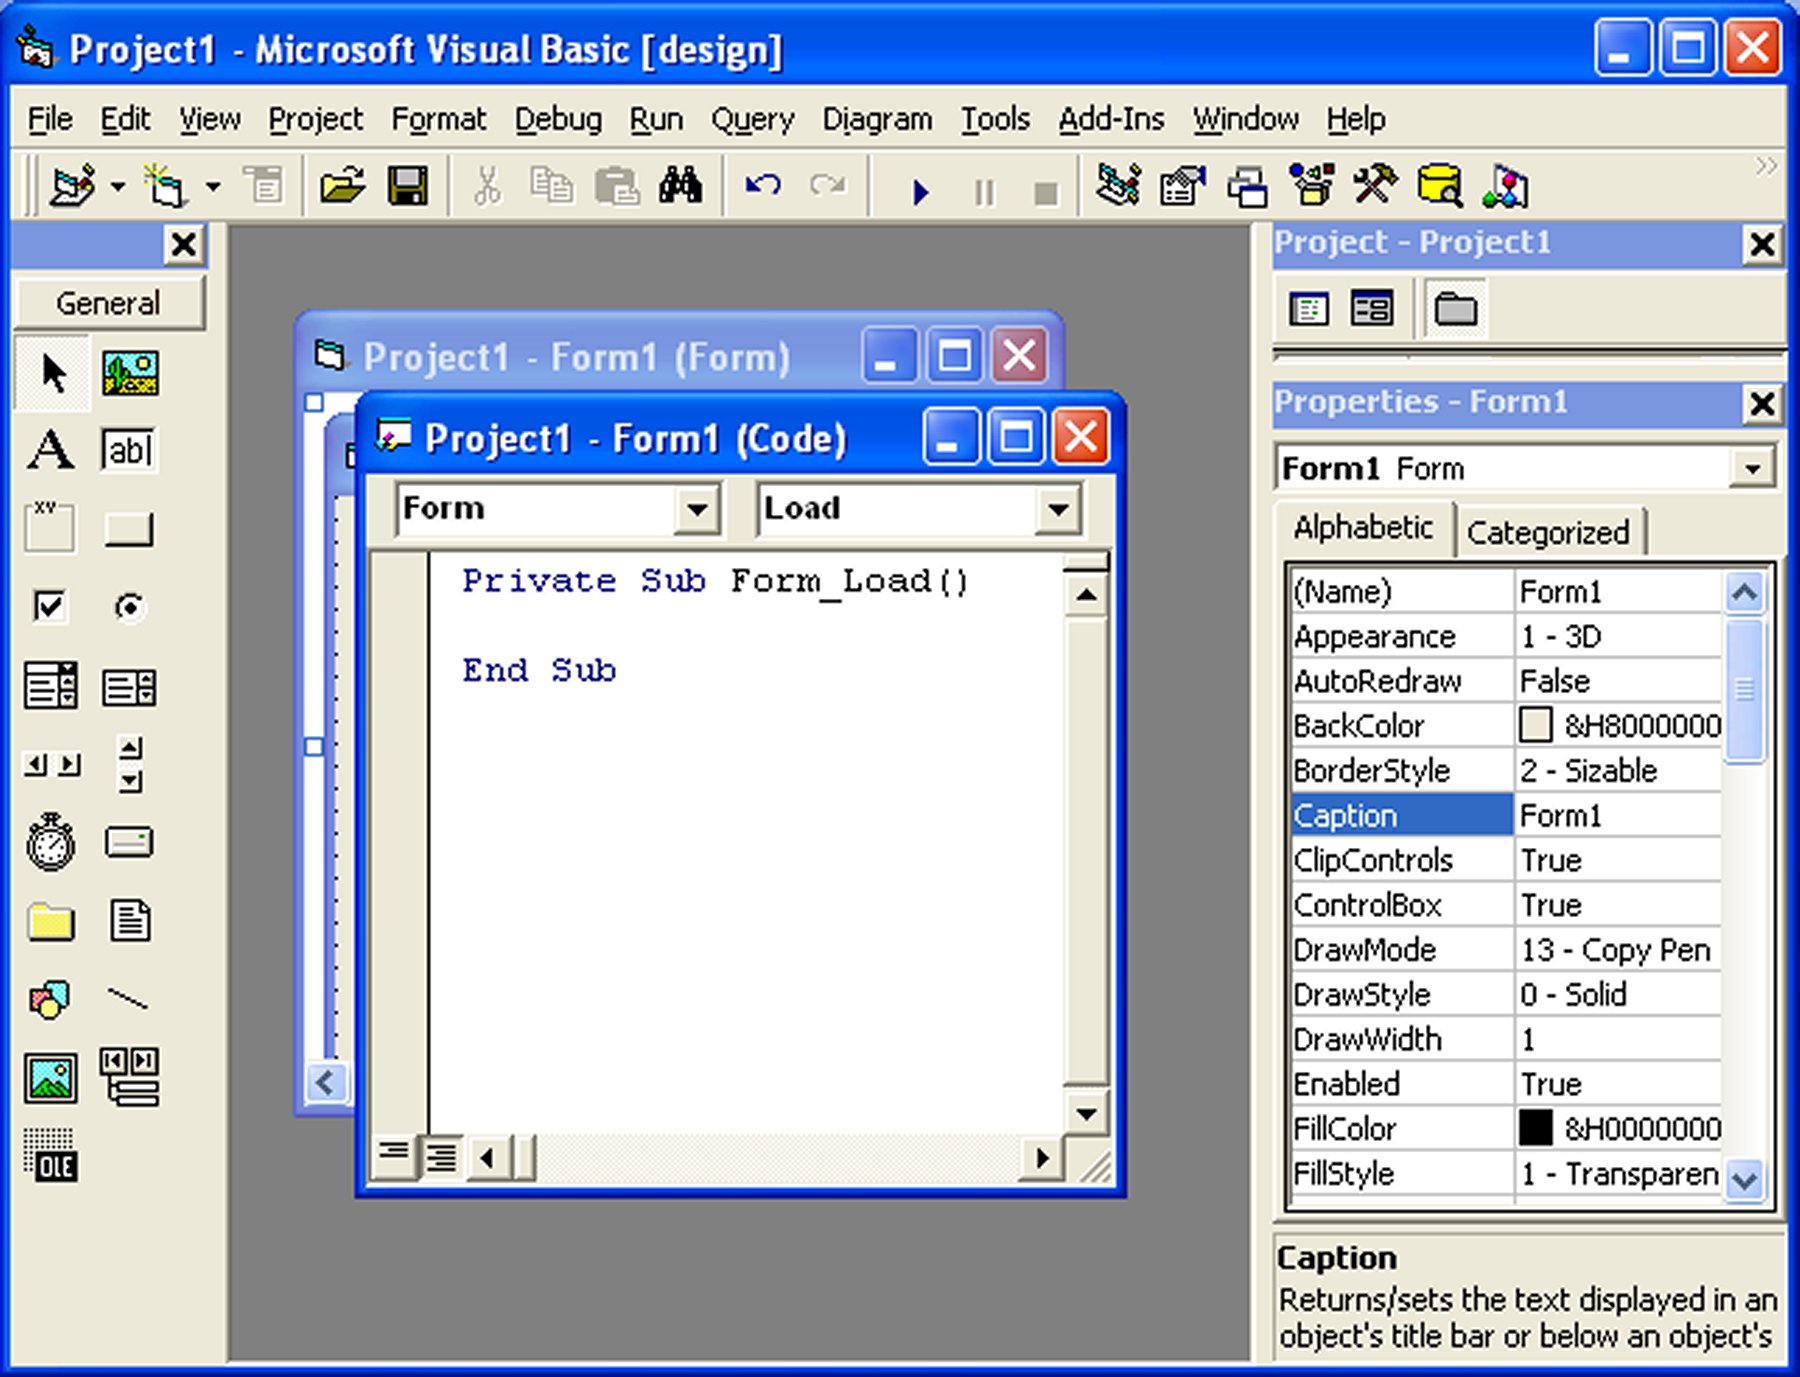
Figure 2.1: The VB6 Source Code Window
Understanding the Object and Procedure Boxes
At the top of the VB6 code window, two drop-down boxes help you navigate the code for objects and events.
Object Box
Lists the available objects on the form, such as Form1, Command1, Label1, and other controls.
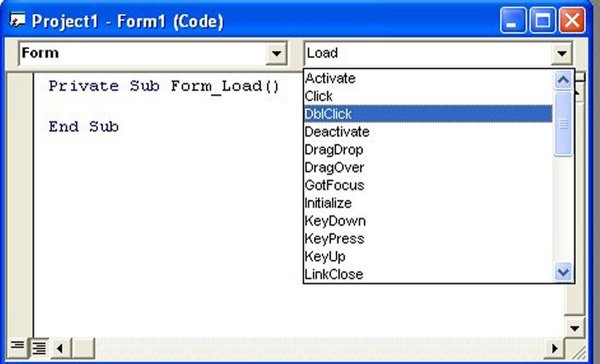
Procedure Box
Lists the events for the selected object, such as Load, Click, DblClick, and Activate.
Figure 2.2: List of Objects
The Object Box displays the controls and objects available on the form.
Figure 2.3: List of Procedures
The Procedure Box displays the events available for the selected object.
Writing Your First Code
VB6 automatically creates the procedure structure for you. Enter your instructions between Private Sub and End Sub.
Private Sub Form_Load()
    Form1.Show
    Print "Welcome to Visual Basic tutorial"
End Sub
Output:
Press F5 or click the Run button in the VB6 IDE to run the application. The text appears directly on the form.

Figure 2.4: Output of the welcome message example
2.2 Performing Arithmetic Operations
The Print statement can also display calculation results. The following example prints addition, subtraction, multiplication, and division results on the form.
Private Sub Form_Activate()
    Print 20 + 10
    Print 20 - 10
    Print 20 * 10
    Print 20 / 10
End Sub
Output:
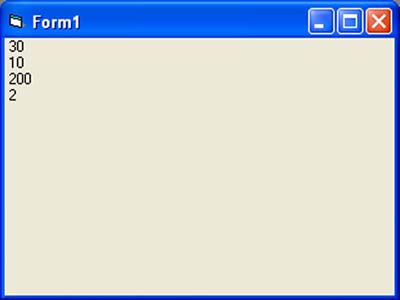
Figure 2.5: Output of arithmetic operations
2.3 Concatenating Strings
String concatenation means joining several pieces of text into one line. VB6 supports both the + operator and the & operator, but & is safer for joining text.
Using +
Can join strings, but may cause problems when mixed with numbers or other data types.
Using &
Recommended for string joining because it clearly indicates concatenation and handles conversion more safely.
Private Sub Form_Load()
    Dim A As String, B As String, C As String
    Dim D As String, E As String
    A = "Tom"
    B = "likes"
    C = "to"
    D = "eat"
    E = "burger"

    Print A + B + C + D + E
    Print A & B & C & D & E
End Sub
Output:

Figure 2.6: Output of string concatenation
2.4 Steps in Building a Visual Basic Application
A typical VB6 program is built by designing the form first, then writing event procedures for the form and controls.
1 Design the Interface
- Add controls such as buttons, labels, and text boxes to the form.
- Set properties such as
Caption,BackColor,ForeColor, andFont.
2 Write Event Procedures
- Double-click a control to open its event procedure.
- Write code that runs when the user clicks, types, loads, or activates something.
Example: Changing Colors Randomly
Create a form with two command buttons and a label. One button changes the form background color, while the other button changes the label foreground color.
Command1
Changes the form background color.
Command2
Changes the label foreground color.
Label1
Displays a message after the foreground color changes.
VB6 Note
In VB6, variable declaration and assignment are normally written on separate lines. The example below uses classic VB6 syntax for better compatibility.
Private Sub Command1_Click()
    ' Change form background color randomly
    Randomize
    Dim R As Integer, G As Integer, B As Integer
    R = Int(Rnd * 256)
    G = Int(Rnd * 256)
    B = Int(Rnd * 256)
    Form1.BackColor = RGB(R, G, B)
End Sub

Private Sub Command2_Click()
    ' Change label foreground color randomly
    Randomize
    Dim R As Integer, G As Integer, B As Integer
    R = Int(Rnd * 256)
    G = Int(Rnd * 256)
    B = Int(Rnd * 256)
    Label1.ForeColor = RGB(R, G, B)
    Label1.Caption = "Foreground Color Changed"
End Sub
Output:
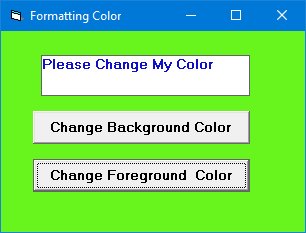
Figure 2.7: Color Changer Application
Lesson Summary
In this lesson, you learned the basic workflow for building a Visual Basic 6 application:
IDE Navigation
You opened the VB6 IDE and used the code window.
Basic Output
You used the Print statement to display text and calculation results.
String Joining
You joined several strings using + and &.
Event-Driven Programming
You wrote click-event code to make a simple interactive color-changing application.
Best Practice
For string concatenation in VB6, prefer the & operator. It makes your intention clearer and helps avoid unexpected type-conversion issues.
Practice Exercises
Try these exercises to strengthen your understanding of VB6 application development:
Exercise 1: Welcome Message
Create a form that prints your name, course, and today's date when the form loads.
Exercise 2: Simple Calculator Output
Use the Print statement to display the sum, difference, product, and quotient of two numbers.
Exercise 3: Better Sentence Output
Modify the string concatenation example so the output includes proper spaces between words.
Exercise 4: Random Color Button
Create one button that changes both the form background color and the label foreground color.
Exercise 5: Caption Changer
Add a command button that changes the form caption to My First VB6 Application.
Next Lesson
Continue your VB6 journey with Lesson 3: Working with Controls.
Related Resources

Visual Basic 6 Made Easy
Start your programming journey with Visual Basic 6 using an easy, beginner-friendly, step-by-step approach.
- Perfect for beginners
- Learn core programming concepts
- Build real VB6 applications

Visual Basic 2026 Made Easy
Upgrade from classic VB to modern VB.NET with Visual Studio 2026, .NET 10, and AI-powered development tools.
- Modern VB.NET development
- Hands-on projects and real apps
- Visual Studio 2026 workflow
🚀 Ready for the Next Level?
After learning the basics with VB6 Made Easy and upgrading to VB2026 Made Easy, continue your journey into advanced professional development.

Advanced VB.NET Programming
Take your VB.NET skills to the next level. Learn advanced programming techniques, real-world architectures, and professional development practices using modern .NET.
Best For:
- After VB6 or VB.NET fundamentals
- Intermediate to advanced learners
- Developers building real-world systems
🚀 Migrating from VB6 to VB.NET
Still using or learning classic Visual Basic 6? This practical step-by-step guide shows you how to migrate legacy VB6 applications to modern VB.NET with Visual Studio 2026 and .NET 10.

VB6 to Modern VB.NET Made Easy
A practical step-by-step guide to migrating legacy Visual Basic 6 applications to VB.NET with Visual Studio 2026 and .NET 10.
- Designed for VB6 programmers and legacy app maintainers
- Clear migration guidance from classic VB to modern .NET
- Perfect bridge between VB6 fundamentals and VB.NET development
🚀 Move to Modern VB.NET
Visual Basic 6 is your foundation — but modern development uses VB.NET with .NET and Visual Studio 2026.
Start VB.NET Tutorial →