Creating Animation in VB6
Learn to create engaging animations using image controls, position properties, and timing techniques
Lesson Overview
Key Takeaway
Visual Basic 6 offers multiple techniques for creating animations, including image visibility toggling, position manipulation, and size modification.
Welcome to Lesson 30 of our Visual Basic 6 Tutorial! In this lesson, you'll explore various techniques to create animations in VB6. While VB6 isn't primarily designed for complex animations, with creative approaches, you can program engaging visual effects.
Animation Techniques Overview
VB6 offers several approaches for creating animations:
Visibility Toggling
Show/hide different images to create the illusion of movement
Position Manipulation
Use Left and Top properties to move objects around the form
Size Modification
Change Height and Width properties to create zoom effects
30.1 Moving Jet Animation
This animation creates the illusion of a jet plane moving in four directions (North, South, East, West) by toggling the visibility of different image controls.

Implementation Steps
1Setup Images
Place five images of a jet plane on the form in different positions
2Visibility Control
Set center image Visible=True, others Visible=False
3Movement Buttons
Create buttons to toggle visibility for each direction
Code Implementation
Private Sub cmdNorth_Click()
    Image1.Visible = False
    Image3.Visible = True
    Image2.Visible = False
    Image4.Visible = False
    Image5.Visible = False
End Sub
Animation Preview
30.2 Command-Based Animation
This approach allows users to control animation through text commands in a textbox.
Code Implementation
Private Sub cmdExecute_Click()
    If Text1.Text = "n" Then
        Image1.Visible = False
        Image3.Visible = True
        '... (other directions similarly)
    ElseIf Text1.Text = "e" Then
        'East movement code
    End If
End Sub
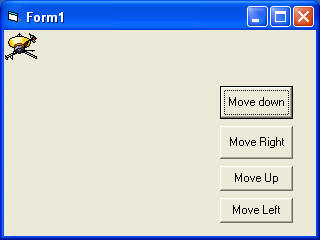
30.3 Position-Based Animation
Manipulate the Left and Top properties of an object to create smooth movement animations.
Understanding Twips
VB6 uses twips as the default measurement unit:
- 1 twip = 1/1440 inch
- Image.Left: Distance from left border
- Image.Top: Distance from top border
Movement Code
Private Sub cmdDown_Click()
    Image1.Top = Image1.Top + 100  'Move down 100 twips
End Sub

Private Sub cmdUp_Click()
    Image1.Top = Image1.Top - 100  'Move up 100 twips
End Sub
Position Animation Demo
30.4 Size Modification Animation
Create zoom effects by changing Height and Width properties.

Code Implementation
Private Sub cmdEnlarge_Click()
    Image1.Height = Image1.Height + 100
    Image1.Width = Image1.Width + 100
End Sub

Private Sub cmdShrink_Click()
    Image1.Height = Image1.Height - 100
    Image1.Width = Image1.Width - 100
End Sub
Lesson Summary
In this lesson, you've learned several animation techniques in VB6:
Visibility Animation
Toggle image visibility to create movement illusions
Position Animation
Manipulate Left and Top properties for smooth movement
Size Animation
Change Height and Width for zoom effects
Command Control
Enable text-based animation control
Important Note
These techniques can be combined for more complex animations. In the next lessons, we'll explore timers for automated animations and more advanced techniques.
Next Lesson
Continue your VB6 journey with Lesson 31: Animation Techniques Part 2.
Related Resources

Visual Basic 6 Made Easy
Start your programming journey with Visual Basic 6. Learn how to build Windows applications step-by-step using an easy and beginner-friendly approach.
- Perfect for beginners
- Learn core programming concepts
- Build real VB6 applications

Visual Basic 2026 Made Easy
Upgrade to modern Visual Basic with VB.NET, .NET 10, and Visual Studio 2026. Build real-world applications with modern tools and AI-powered development.
- Modern VB.NET development
- Hands-on projects and real apps
- GitHub Copilot & AI integration
🚀 Ready for the Next Level?
After learning the basics with VB6 Made Easy and upgrading to VB2026 Made Easy, continue your journey into advanced professional development.

Advanced VB.NET Programming
Take your VB.NET skills to the next level. Learn advanced programming techniques, real-world architectures, and professional development practices using modern .NET.
Best For:
- After VB6 or VB.NET fundamentals
- Intermediate to advanced learners
- Developers building real-world systems
🚀 Migrating from VB6 to VB.NET
Still using or learning classic Visual Basic 6? This practical step-by-step guide shows you how to migrate legacy VB6 applications to modern VB.NET with Visual Studio 2026 and .NET 10.

VB6 to Modern VB.NET Made Easy
A practical step-by-step guide to migrating legacy Visual Basic 6 applications to VB.NET with Visual Studio 2026 and .NET 10.
- Designed for VB6 programmers and legacy app maintainers
- Clear migration guidance from classic VB to modern .NET
- Perfect bridge between VB6 fundamentals and VB.NET development
🚀 Move to Modern VB.NET
Visual Basic 6 is your foundation — but modern development uses VB.NET with .NET and Visual Studio 2026.
Start VB.NET Tutorial →