Lesson 37: Creating Menus for VB Applications
Design professional menu systems for your VB6 applications
Key Takeaway
Professional menu systems enhance application usability and provide intuitive navigation for users.
Welcome to Lesson 37 of our Visual Basic 6 Tutorial! In this lesson, you'll learn how to create professional menu systems for your VB6 applications using both the Application Wizard and the Menu Editor.
37.1 Adding Menu Bar Using Visual Basic's Application Wizard
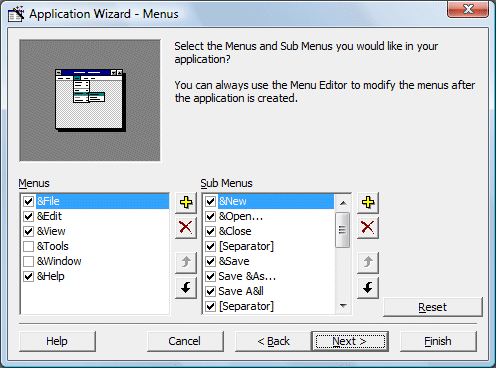
The easiest way to add a menu bar to your application is by using Visual Basic's Application Wizard. This wizard allows the user to insert fully customized standard Windows menu into his or her application.
Quick Setup
Rapidly create professional menus with minimal effort
Standard Patterns
Follow established Windows menu conventions
Pre-built Code
Includes functional code for common menu actions
Getting Started:
1 Launch Application Wizard
Click on the Application Wizard icon at the Visual Basic new project dialog box.
2 Configure Interface Type
Choose Single Document Interface (SDI) and enter your project name.
3 Select Menu Items
Check the menu items you want to include in your application.
4 Complete Wizard
Finish the wizard to generate your menu system with functional code.


Important
The Application Wizard generates functional code for common actions like File Open, but you'll need to customize this code for your specific application requirements.
Customizing the File Open Functionality
Here's how to modify the File Open menu code to load images into an ImageBox:
Private Sub mnuFileOpen_Click()Dim sFile As StringWith dlgCommonDialog.DialogTitle = "Open".CancelError = False' Set the flags and attributes of the common dialog control.Filter = "Bitmaps(*.BMP)|*.BMP|Metafiles(*.WMF)|*.WMF|" & _"Jpeg Files(*.jpg)|*.jpg|GIF Files(*.gif)|*.gif|" & _"Icon Files(*.ico)|*.ico|All Files(*.*)|*.*".ShowOpenImage1.Picture = LoadPicture(.FileName)If Len(.FileName) = 0 Then Exit SubsFile = .FileNameEnd WithEnd Sub


37.2 Adding Menu Bar Using Menu Editor
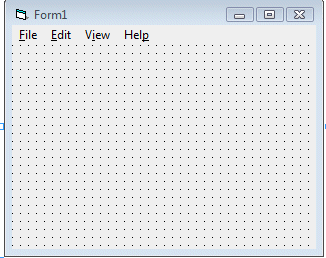
For more control over your menu design, use the Menu Editor to create custom menu systems tailored to your application's needs.
Complete Control
Design menus precisely to your specifications
Custom Options
Create unique menu items not available in the wizard
Hierarchical Menus
Build multi-level menus with sub-items
Menu Editor Steps:
1 Access Menu Editor
Go to Tools > Menu Editor in the Visual Basic IDE.
2 Create Menu Items
Add menu items with captions and names (e.g., &File and mnuFile).
3 Add Submenus
Use the right arrow to create submenu items under main menus.
4 Write Event Handlers
Click menu items in the form to create and edit their code.


Best Practice
Use ampersands (&) in menu captions to create keyboard shortcuts (e.g., &File creates Alt+F shortcut).
Lesson Summary
In this lesson, you've learned two approaches to creating professional menus for your VB6 applications:
Application Wizard
Quickly create standard menus with functional code
Menu Editor
Design custom menus with complete control over structure
Customization
Modify menu code to implement your application's functionality
Best Practices
Follow Windows UI conventions for intuitive user experience
Pro Tip
Combine both approaches - start with the Application Wizard for common menus, then use the Menu Editor to add custom items.
Next Lesson
Continue your VB6 journey with Lesson 38: Keyboard Handling.
Related Resources

Visual Basic 6 Made Easy
The comprehensive guide to mastering VB6 development, including professional menu design techniques.
What You'll Learn:
- Menu design principles
- Application Wizard usage
- Menu Editor techniques
- Keyboard shortcuts
- Context menus

Visual Basic 2022 Made Easy
The modern guide to VB.NET programming with Visual Studio 2022. Master modern menu design techniques.
What You'll Learn:
- MenuStrip control
- ContextMenuStrip
- ToolStrip integration
- Modern UI design
- Accessibility features